CNCF Blog Projects Category
Scaling organizational structure with Meshery’s expanding ecosystem
As a high velocity project and one of the fastest-growing projects in the CNCF ecosystem, Meshery’s increasing scale and community contributions necessitates this recognition, which requires a revision to its governance and organizational structure that better aligns with the scale of its growing complexity and community contributions. To best serve its expansive ecosystem, Meshery maintainers have opted to partition the numerous GitHub repositories into two distinct organizations: github.com/meshery for the core platform and github.com/meshery-extensions for extensions and integrations.
This post explains the rationale behind the shift, outlining the proposed governance structure, setting expectations around support, and describing project mechanics, drawing inspiration from other successful CNCF projects.
Rationale for Repository Partitioning
The decision to partition repositories aims to improve project structure, manageability, scalability, and community engagement.
Project architecture
Meshery is a highly extensible, self-service management platform. Every feature is developed with extensibility in mind, as is evident by the ubiquity of extension points throughout Meshery’s architecture.
Modularity and focus
Separating the core platform from extensions allows the Meshery core team to concentrate on maintaining and enhancing the primary platform, which includes critical components like Meshery Operator and MeshSync. Extensions, such as adapters for specific cloud native technologies, can be developed and maintained independently by community contributors or specialized teams. This modularity ensures that the core platform remains robust and focused.
Project scalability
With support for over 300 integrations and counting, managing everything under one GitHub organization has become impractical. A separate organization for extensions simplifies permission management, contribution processes, and release cycles, making the ecosystem more scalable.
- Community ownership and maintenance: Projects within meshery-extensions are generally initiated, developed, and maintained by members of the community, rather than the core maintainers. This allows the ecosystem to scale beyond what the core team can directly support.
- Clearer support expectations: Distinguishing between the core and extensions makes it clear that projects in meshery-extensions have different maintenance levels, release cadences, and support guarantees compared to the core components. This clarifies that users are relying on community support for these specific integrations.
Community engagement
By providing a dedicated space for extensions, Meshery encourages community contributions, as developers can create and maintain extensions without needing deep involvement in the core platform’s development. With this approach, meshery-extensions fosters a vibrant ecosystem around Meshery by providing a designated, community-centric space for extensions, integrations, and tooling, keeping the core project focused and manageable while enabling broad community participation.
- Incubation and experimentation: The separate organization acts as an incubator for new ideas, providers, or tooling related to Meshery. Projects can start here and, if they gain significant traction and stability, will be considered for migration or closer integration with the core project.
- Ecosystem growth: Part of Meshery’s power lies in its ability to manage any infrastructure via Providers, Models, Adapters, and its other extension points. Since there are countless APIs and services, meshery-extensions serves as the place where the community can build and share Providers for less common cloud services, specific SaaS platforms, or even internal company APIs, without needing official endorsement or maintenance from the core maintainers.
Governance Structure
The new structure allows for different governance models and maintainer structures for community projects compared to the core project. Meshery can adopt a governance model that balances control over the core platform with flexibility for extensions, drawing from its existing governance and the Kubernetes’ SIG model.
Core Platform (github.com/meshery)
- Governance: Governed by the core Meshery maintainers, as outlined in the project’s governance document. Roles include contributors, organization members, and maintainers, with clear processes for becoming a maintainer (e.g., nomination, voting by existing maintainers).
- Responsibilities: Maintainers review, approve, and merge pull requests, manage releases, and ensure the platform’s stability and alignment with CNCF standards.
- Decision-making: Decisions are made through consensus among maintainers, with regular meetings and transparent communication via Slack and community forums.
Extensions (github.com/meshery-extensions)
- Governance: Each extension may have its own maintainers and a lighter governance structure to encourage innovation. A review process by the core team ensures extensions meet quality and compatibility standards.
- Maintainer selection: Extension maintainers can be nominated by community members or self-nominated, with approval from the core team based on contribution history and technical expertise.
- Autonomy: Extension teams have autonomy over their development processes, provided they adhere to Meshery’s code of conduct and integration guidelines.
Oversight and Coordination
- Steering committee: A steering committee, composed of core maintainers and representatives from active extension teams, oversees cross-organization alignment, resolves conflicts, and approves new extensions.
- Transparency: Both organizations maintain open communication with public meeting minutes, discussion forums, and regular updates to the community.
Delineated support expectations
Support expectations differ between the core platform and extensions to reflect their distinct roles and maintenance models.
Core platform
- Full support: The core team provides regular updates, bug fixes, and feature enhancements, ensuring stability for critical components like Meshery Operator and MeshSync.
- Documentation: Comprehensive guides, such as installation instructions and CLI usage, are maintained (Meshery Documentation).
- Community support: Active engagement through Slack, forums, and weekly newcomer meetings to support users and contributors.
Extensions
- Variable support: Core team-maintained extensions receive robust support, while community-maintained ones may have limited support.
- Clear labeling: Documentation should indicate the support level (e.g., “Official” vs. “Community”) for each extension.
- Integration support: The core platform provides stable APIs and extension points, ensuring compatibility, with guidelines for developers (Meshery Extensions).
Project mechanics
Managing two organizations involves distinct development, testing, and integration processes to ensure a cohesive ecosystem.
Development process
- Platform: Follows a structured release cycle with stable and edge channels. Changes undergo rigorous review to sustain stability. Notify platform extenders and system integrators of upcoming changes in the underlying framework to ensure time is afforded to maintain compatibility.
- Extensions: Operate on independent release cycles, allowing rapid iteration. Developers use Meshery’s extension points to integrate with the core platform, following contribution guidelines.
Integration testing
- Compatibility testing: Extensions are tested against multiple core platform versions to deliver compatibility, using guidance for verifying compatibility between core platform and extensions.
- Automated pipelines: GitHub Actions automate testing and snapshot generation, as seen in extensions like Helm Kanvas Snapshot.
- Performance testing: Meshery’s performance management features can be used to benchmark extensions, ensuring they meet efficiency standards.
Documentation and resources
- Comprehensive guides: Documentation covers core platform usage, extension development, and integration (Meshery Docs). The Newcomers’ Guide and MeshMates program aid onboarding (Meshery Community).
- Catalog and templates: Meshery’s catalog of design templates includes extension configurations, and promoting best practices (Meshery Catalog).
- Community resources: Weekly meetings, Slack channels, and the community handbook provide ongoing support.
Reflections on other projects
Meshery’s expansion strategy draws inspiration from successful models within the Cloud Native Computing Foundation (CNCF), like Argo, Crossplane, and Kubernetes. These projects demonstrate effective approaches to decentralized governance and focused development through the separation of core and community-contributed components.
Meshery aims to emulate Crossplane’s model of maintaining a clear distinction between its core platform (github.com/crossplane) and community contributions (github.com/crossplane-contrib). This separation allows third-party developers to extend Crossplane’s capabilities without affecting the core’s stability, a model that supports Meshery’s approach to fostering innovation while maintaining a reliable core.
Similarly, Meshery Extension teams operate with autonomy over their development processes, provided they adhere to Meshery’s core component frameworks and integration guidelines. This mirrors Argo’s model (github.com/argoproj-labs), where projects function independently but align with broader project goals.
Kubernetes provides a robust model for decentralized governance through its use of github.com/kubernetes for core components and github.com/kubernetes-sigs for Special Interest Groups (SIGs). Each SIG acts as a mini-community with its own charter, leadership, and processes, all while aligning with overarching project goals, as outlined in theKubernetes Governance. Meshery’s extension organization can adopt a similar structure, enabling extension teams to operate autonomously within defined guidelines.
Meshery umbrella expands
See the current list of repositories under each organization: meshery org repos and meshery-extensions org repos.
By partitioning repositories into github.com/meshery andgithub.com/meshery-extensions, Meshery is taking a strategic step towards the overarching goal of improved modularity, scalability, and community engagement.
By adopting a governance structure that balances control and flexibility, delineating clear support expectations, and implementing robust project mechanics, Meshery can effectively manage its growing ecosystem. Drawing inspiration from graduated projects, Meshery is poised to remain a leading CNCF project—empowering collaborative cloud native management.
Kubernetes WG Serving concludes following successful advancement of AI inference support
The Kubernetes Working Group (WG) Serving was created to support development of the AI inference stack on Kubernetes. The goal of this working group was to ensure that Kubernetes is an orchestration platform of choice for inference workloads. This goal has been accomplished, and the working group is now being disbanded.
WG Serving formed workstreams to collect requirements from various model servers, hardware providers, and inference vendors. This work resulted in a common understanding of inference workload specifics and trends and laid the foundation for improvements across many SIGs in Kubernetes.
The working group oversaw several key evolutions related to load balancing and workloads. The inference gateway was adopted as a request scheduler. Multiple groups have worked to standardize AI gateway functionality, and early inference gateway participants went on to seed agent networking work in SIG Network.
The use cases and problem statements gathered by the working group informed the design of AIBrix.
Many of the unresolved problems in distributed inference — especially benchmarking and recommended best practices — have been picked up by the llm-d project, which hybridizes the infrastructure and ML ecosystems and is better able to steer model server co-evolution.
In particular, llm-d and AIBrix represent more appropriate forums for driving requirements to Kubernetes SIGs than this working group. llm-d’s goal is to provide well-lit paths for achieving state-of-the-art inference and aims to provide recommendations that can compose into existing inference user platforms. AIBrix provides a complete platform solution for cost-efficient LLM inference.
WG Serving helped with Kubernetes AI Conformance requirements. The llm-d project is leveraging multiple components from the profile and making recommendations to end users consistent with Kubernetes direction (including Kueue, inference gateway, LWS, DRA, and related efforts). Widely adopted patterns and solutions are expected to go into the conformance program.
All efforts currently running inside WG Serving can be migrated to other working groups or directly to SIGs. Requirements will be discussed in SIGs and in the llm-d community. Specifically:
- Autoscaling-related questions — mostly related to fast bootstrap — will be discussed in SIG Node or SIG Scheduling.
- Multi-host, multi-node work can continue as part of SIG Apps (for example, for the LWS project), and DRA requirements will be discussed in WG Device Management.
- Orchestration topics will be covered by SIG Scheduling and SIG Node.
- Requirements for DRA will be discussed in WG Device Management.
The Gateway API Inference Extension project is already sponsored by SIG Network and will remain there. The Serving Catalog work can be moved to the Inference Perf project. Originally it was designed for a larger scope, but it has been used mostly for inference performance.
The Inference Perf project is sponsored by SIG Scalability, and no change of ownership is needed.
CNCF thanks all contributors who participated in WG Serving and helped advance Kubernetes as a platform for AI inference workloads.
Exposing Spin apps on SpinKube with GatewayAPI
The Gateway API isn’t just an “Ingress v2”, it’s an entirely revamped approach for exposing services from within Kubernetes and eliminates the need of encoding routing capabilities into vendor-specific, unstructured annotations. In this post, we will explore how to expose WebAssembly applications built using the CNCF Spin framework and served by SpinKube using the Gateway API.
What is SpinKube
SpinKube, a CNCF sandbox project, is an open-source stack for running serverless WebAssembly applications (Spin apps) on top of Kubernetes. Although SpinKube leverages Kubernetes primitives like Deployments, Services and Pods, there are no containers involved for running your serverless Spin apps at all. Instead, it leverages a containerd-shim implementation and spawns processes on the underlying Kubernetes worker nodes for running Spin apps.
You can learn more about SpinKube and find detailed instructions on how to deploy SpinKube to your Kubernetes cluster at https://spinkube.dev.
What is Gateway API
The Gateway API is the modern, role-oriented successor to the legacy Ingress resource, designed to provide a more expressive and extensible networking interface for Kubernetes. Unlike Ingress, which often relies on a messy sprawl of vendor-specific annotations to handle complex logic, the Gateway API breaks traffic management into atomic resources —GatewayClass, Gateway, and routes (like HTTPRoute or GRPCRoute).
This separation allows infrastructure admins to manage the entry points while giving developers control over how their specific services are exposed, enabling native support for advanced traffic patterns like canary rollouts, header-based routing, and traffic mirroring without the need for bespoke configurations.
To dive deeper into the technical specifications and resource hierarchy, head over to the official Gateway API documentation.
Provisioning a Kubernetes cluster, installing SpinKube and implementing Spin apps are considered beyond the scope of this article. However, you can head over to https://github.com/akamai-developers/exposing-spin-apps-with-gatway-api – a repository containing all source code, along with the necessary instructions for setting up a LKE cluster with SpinKube.
To follow the article’s demo, you’ll deploy the required artifacts to your Kubernetes cluster. Make sure you have the following tools installed:
- The
spinCLI (see https://spinframework.dev for installation instructions) - Rust along with the
wasm32-wasip1target (See https://rust-lang.github.io/rustup/ for detailed instructions) - Both CLIs
kubectlandhelmfor interacting with your Kubernetes cluster(See https://kubernetes.io/docs/tasks/tools/ and https://helm.sh/docs/intro/install respectively)- Once you’ve installed
kubectldownload necessary credentials for accessing your Kubernetes cluster
- Once you’ve installed
Build and deploy the Spin apps to Kubernetes
Let’s start by compiling the source code of our sample Spin apps down to WebAssembly. Doing so is as easy as executing the spin build command from within each application folder:
# Build the greeter application
pushd apps/greeter
spin build

 Building component greeter with `cargo build --target wasm32-wasip1 --release`
     Finished `release` profile [optimized] target(s) in 0.21s
 Finished building all Spin components

popd

# Build the prime_numbers application
pushd apps/prime-numbers
spin build

  Building component prime-numbers with `cargo build --target wasm32-wasip1 --release`
    Finished `release` profile [optimized] target(s) in 0.18s
  Finished building all Spin components
popd
Once the application has been compiled, we use the spin registry push to distribute it as OCI artifact. (If your OCI compliant registry requires authentication, you must login first. Use the spin registry login to authenticate before trying to push).
Tip: For testing purposes, we’ll use ttl.sh an anonymous and ephemeral OCI compliant registry, which allows us to store our applications for 24 hours by simply specifying the TTL as a tag.
# specify variables
greeter_app_artifact=ttl.sh/spin-greeter:24h
primenumbers_app_artifact=ttl.sh/spin-prime-numbers:24h

# optional: Authenticate against registry
oci_reg_server=
oci_reg_user=
oci_reg_password=
spin registry login $oci_reg_server -u $oci_reg_user -p $oci_reg_password

# distribute the Spin applications
pushd apps/greeter
spin registry push $greeter_app_artifact --build
popd

pushd apps/prime-numbers
spin registry push $primenumbers_app_artifact --build
popd
Finally, we use the spin kube scaffold command for generating the necessary Kubernetes manifests.
Tip: Spin does not have any opinions on how you deploy resources to your Kubernetes cluster. You can either use kubectl, create a Helm chart and deploy it using the helm CLI, or describe the desired state and deploy it with GitOps.
For the sake of this article, we’ll simply pipe the generated manifest to kubectl apply. The actual manifests are shown here for illustration purposes:
# Deploy the Spin applications to Kubernets
spin kube scaffold --from $greeter_app_artifact | kubectl apply -f -
spin kube scaffold --from $primenumbers_app_artifact | kubectl apply -f -
apiVersion: core.spinkube.dev/v1alpha1
kind: SpinApp
metadata:
  name: spin-greeter
spec:
  image: "ttl.sh/spin-greeter:24h"
  executor: containerd-shim-spin
  replicas: 2
---
apiVersion: core.spinkube.dev/v1alpha1
kind: SpinApp
metadata:
  name: spin-prime-numbers
spec:
  image: "ttl.sh/spin-prime-numbers:24h"
  executor: containerd-shim-spin
  replicas: 2
Obviously, there are additional knobs you can turn when executing spin kube scaffold, I highly encourage you to checkout the documentation for the command by providing the --help flag.
Testing the Spin app
We use traditional port-forwarding provided by kubectl to verify that both Spin applications runs as expected:
kubectl port-forward svc/spin-greeter 8080:80
Sent a GET request to the application using curl:
curl -i localhost:8080/hello/Akamai%20Developers

HTTP/1.1 200 OK
content-type: text/plain
transfer-encoding: chunked
date: Mon, 19 Jan 2026 13:55:34 GMT

Hello, Akamai Developers!
Next, let’s test the second Spin application:
kubectl port-forward svc/spin-prime-numbers 8080:80
Again, use curl to invoke one of the endpoints exposed by the Spin app:
curl -i localhost:8080/above/42

HTTP/1.1 200 OK
transfer-encoding: chunked
date: Mon, 19 Jan 2026 17:05:02 GMT

Next prime number above 42 is 43
Now that both apps are working, you can terminate port-forwarding again (`CTRL+C) and dive into exposing both Spin apps.
Installing Gateway API CRDs and Controller
To use the Gateway API, we must install the corresponding Gateway API resources (CRDs) on our cluster along with a Gateway API Controller.
There are several controllers available that implement the Gateway API. You can find a list of available Gateway API controllers at https://gateway-api.sigs.k8s.io/implementations/. We’ll use NGINX Gateway Fabric for now.
To install Gateway API resources run:
kubectl kustomize "https://github.com/nginx/nginx-gateway-fabric/config/crd/gateway-api/standard?ref=v2.3.0" | kubectl apply -f -To install NGINX Gateway Fabric run:
helm install ngf oci://ghcr.io/nginx/charts/nginx-gateway-fabric --create-namespace -n nginx-gateway
Creating cluster-specific Gateway API resources
With the Gateway API controller installed, we will first deploy a Gateway to our cluster. Think of the Gateway as an entry point into your Kubernetes cluster, which could be shared across multiple applications. We’ll now create the spinkube Gateway, which will front our two Spin applications that are already running in the default namespace.
apiVersion: gateway.networking.k8s.io/v1
kind: Gateway
metadata:
	name: spinkube
	namespace: default
spec:
	gatewayClassName: nginx
	listeners:
	- protocol: HTTP
	  port: 8080
	  name: http
	  allowedRoutes:
	  	namespaces:
	  		from: Same
Once you’ve deployed the Gateway, you should find a new service being provisioned to the default namespace called spinkube-nginx of type LoadBalancer once the cloud controller has acquired a public IP address, you should find it as part of the output as well.
kubectl get services

NAME            TYPE         EXTERNAL-IP
spinkube-nginx  LoadBalancer 172.238.61.25
Note down the external IP address of the spinkube-nginx service, we’ll use it in a few minutes to send requests to our Spin applications from outside of the cluster!
Creating application-specific Gateway API Resources
As we have deployed two different Spin applications to our Kubernetes cluster, we’ll also create two instances of HTTPRoute and link them to the Gateway we created in the previous section.
Tip: As managing external DNS is beyond the scope of this article, we’ll use simple PathPrefix based routing in combination with a Rewrite filter to route inbound requests to the desired Spin applications.
Create the following HTTPRoute resources in the default namespace:
apiVersion: gateway.networking.k8s.io/v1
kind: HTTPRoute
metadata:
  name: greeter
  namespace: default
spec:
  parentRefs:
  - name: spinkube
  rules:
  - backendRefs:
    - name: spin-greeter
      port: 80
    filters:
    - type: URLRewrite
      urlRewrite:
        path:
          replacePrefixMatch: /
          type: ReplacePrefixMatch
    matches:
    - path:
        type: PathPrefix
        value: /greeter
---
apiVersion: gateway.networking.k8s.io/v1
kind: HTTPRoute
metadata:
  name: prime-numbers
  namespace: default
spec:
  parentRefs:
  - name: spinkube
  rules:
  - backendRefs:
    - name: spin-prime-numbers
      port: 80
    filters:
    - type: URLRewrite
      urlRewrite:
        path:
          replacePrefixMatch: /
          type: ReplacePrefixMatch
    matches:
    - path:
        type: PathPrefix
        value: /prime-numbers
Accessing the Spin apps
Having all Kubernetes resources in place, it’s time for a final test. We discovered the public IP address associated with our Gateway earlier in this post. Let’s use curl again for sending requests to both Spin application:
# Send request to the greeter app
curl -i http:///<your_gateway_ip>:8080/greet/hello/Akamai%20Developers

HTTP/1.1 200 OK
Server: nginx
Date: Mon, 19 Jan 2026 16:37:22 GMT
Content-Type: text/plain
Transfer-Encoding: chunked
Connection: keep-alive

Hello, Akamai Developers!


# Send request to the prime-numbers app
curl -i http://<your_gateway_ip>:8080/prime-numbers/above/999

HTTP/1.1 200 OK
Server: nginx
Date: Mon, 19 Jan 2026 16:37:50 GMT
Transfer-Encoding: chunked
Connection: keep-alive

Next prime number above 999 is 1009
As you can see, our requests get routed to the desired Spin application because of the path prefix (either greeter or prime-numbers).
Conclusion
The Kubernetes Gateway API streamlines how we expose services from within a Kubernetes cluster and allows precise separation of concerns. Cloud infrastructure and cluster operators create and manage resources that could be shared across multiple applications like the Gateway, while application developers provide application (or service) specific resources such as an HTTPRoute.
Especially when running tens or hundreds of different serverless applications on top of SpinKube it’s crucial to have robust and reliable routing in place to ensure applications are accessible from outside of the cluster. The Gateway API for Kubernetes makes managing these a breeze.
Contributors from Akamai collaborate on SpinKube development to deliver this runtime across its global cloud and edge. Additional information is available.at akamai.com.
Making Harbor production-ready: Essential considerations for deployment
Harbor is an open-source container registry that secures artifacts with policies and role-based access control, ensuring images are scanned for vulnerabilities and signed as trusted. To learn more about Harbor and how to deploy it on a Virtual Machine (VM) and in Kubernetes (K8s), refer to parts 1 and 2 of the series.
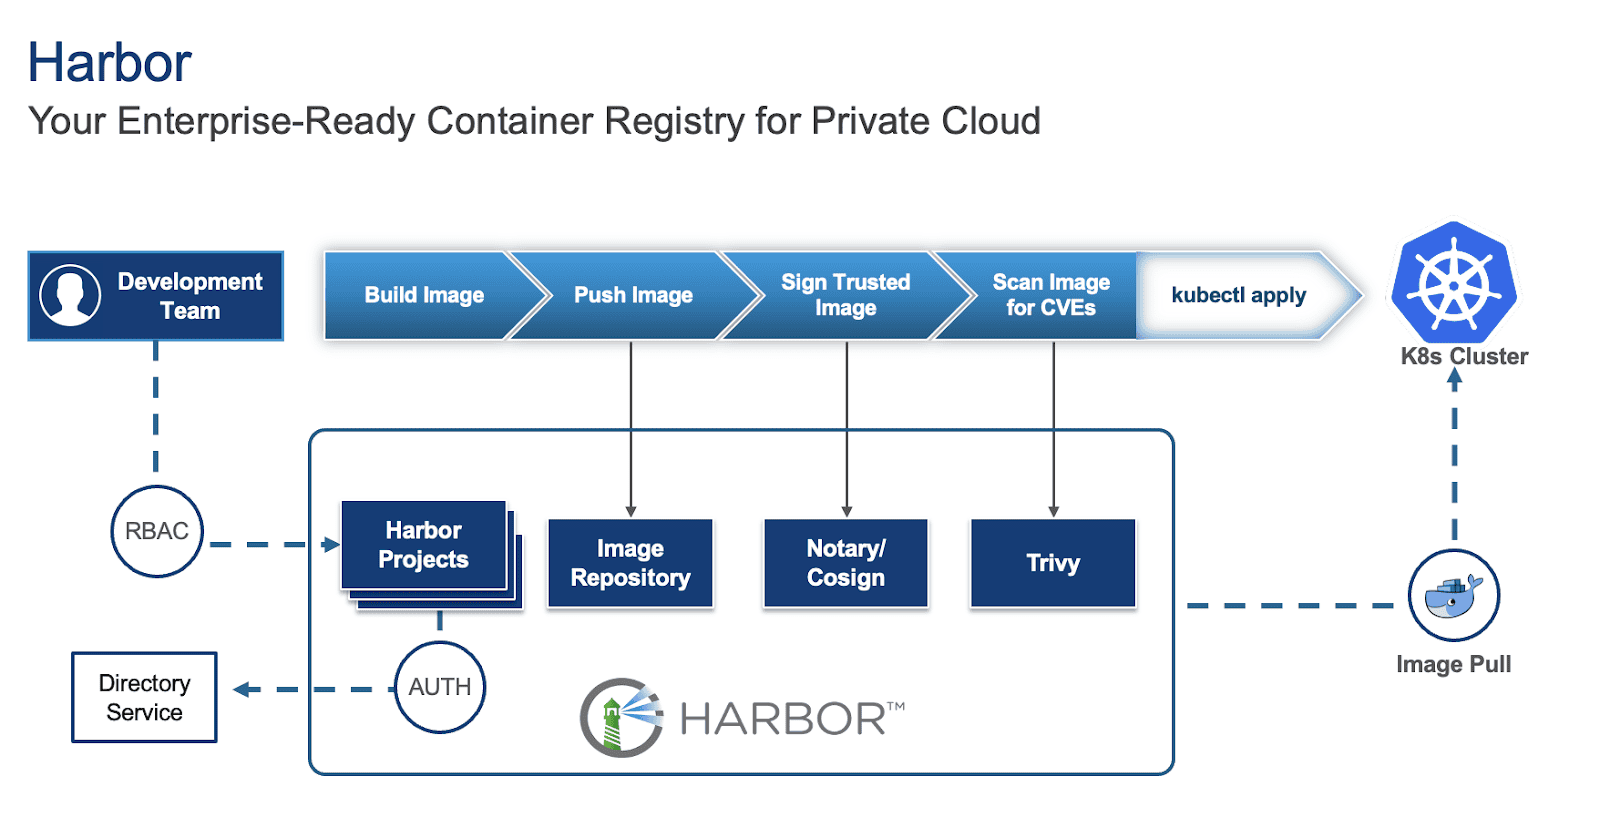
While deploying Harbor is straightforward, making it production-ready requires careful consideration of several key aspects. This blog outlines critical factors to ensure your Harbor instance is robust, secure, and scalable for production environments.
For this blog, we will focus on Harbor deployed on Kubernetes via Helm as our base and provide suggestions for this specific deployment.
1. High Availability (HA) and scalability
For a production environment, single points of failure are unacceptable, especially for an image registry that will act as a central repository for storing and pulling images and artifacts for development and production applications. Thus, implementing high availability for Harbor is crucial and involves several key considerations:
- Deploy with an Ingress: Configure a Kubernetes Service of type Ingress controller (e.g. Traefik) in front of your Harbor instances to distribute incoming traffic efficiently and provide a unified entry point along with cert-manager for certificate management. You can specify this in your values.yaml file under:
expose:
  type: ingress
  tls:
    enabled: true
    certSource: secret
  ingress:
    hosts:
      core: harbor.yourdomain.com
    annotations:
      # Specify your ingress class
      kubernetes.io/ingress.class: traefik
      # Reference your ClusterIssuer (e.g., self-signed or internal CA)
      cert-manager.io/cluster-issuer: "harbor-cluster-issuer"
To locate your values.yaml file, refer to the previous blog.
- Utilize multiple Harbor instances: Increase the replica count for critical Harbor components (e.g., core, jobservice, portal, registry, trivy) in your values.yaml to ensure redundancy.
core:
  replicas: 3
jobservice:
  replicas: 3
portal:
  replicas: 3
registry:
  replicas: 3
trivy:
  replicas: 3

# While not strictly for the HA of the registry itself, consider increasing exporter replicas for robust monitoring availability
exporter:
  replicas: 3

# Optionally, if using Ingress, consider increasing the Nginx replicas for improving Ingress availability
nginx:
  replicas: 3
Configure shared storage: For persistent data, configure Kubernetes StorageClasses and PersistentVolumes to use shared storage solutions like vSAN or a distributed file system. Specify these in your values.yaml under:
persistence:
  enabled: true
  resourcePolicy: "keep"
  persistentVolumeClaim:
    registry:
      #If left empty, the kubernetes cluster default storage class will be used
      storageClass: "your-storage-class"
     jobservice:
       storageClass: "your-storage-class"
     database:
       storageClass: "your-storage-class"
    redis:
      storageClass: "your-storage-class"
    trivy:
      storageClass: "your-storage-class"
- Enable database HA (PostgreSQL): While Harbor comes with a built-in PostgreSQL database, it is not recommended for production use as it:
- Lack of high availability (HA): The default internal PostgreSQL setup within the Harbor Helm chart is typically a single instance. This creates a single point of failure. If that database pod goes down, your entire Harbor instance will be unavailable.
- Limited scalability: An embedded database is not designed for independent scaling. If your Harbor usage grows, you might hit database performance bottlenecks that are difficult to address without disrupting Harbor itself.
- Complex lifecycle management: Managing backups, point-in-time recovery, patching, and upgrades for a stateful database directly within an application’s Helm chart can be significantly more complex and error-prone than with dedicated database solutions.
Thus, it is recommended to deploy a highly available PostgreSQL cluster within Kubernetes (e.g., using a Helm chart for Patroni or CloudNativePG) or leverage a managed database service outside the cluster. Configure Harbor to connect to this HA database by updating the values.yaml:
database:
  type: "external"
  external:
    host: "192.168.0.1"
    port: "5432"
    username: "user"
    password: "password"
    coreDatabase: "registry"
    # If using an existing secret, the key must be "password"
    existingSecret: ""
    # "disable" - No SSL
    # "require" - Always SSL (skip verification)
    # "verify-ca" - Always SSL (verify that the certificate presented by the
    # server was signed by a trusted CA)
    # "verify-full" - Always SSL (verify that the certification presented by the
    # server was signed by a trusted CA and the server host name matches the one
    # in the certificate)
    sslmode: "verify-full"
Implement Redis HA: Deploy a highly available Redis cluster in Kubernetes (e.g., using a Helm chart for Redis Sentinel or Redis Cluster) or utilize a managed Redis service. Configure Harbor to connect to this HA Redis instance by updating redis.type and connection details in values.yaml.
redis:
  type: external
  external:
    addr: "192.168.0.2:6397"
    sentinelMasterSet: ""
    tlsOptions:
      enable: true
    username: ""
    password: ""
2. Security best practices
Security is paramount for any production system, especially a container registry.
Enable TLS/SSL: Always enable TLS/SSL for all Harbor components.
expose:
  tls:
    enabled: true
    certSource: auto # change to manual if using cert-manager
    auto:
      commonName: ""
internalTLS:
  enabled: true
  strong_ssl_ciphers: true
  certSource: "auto"
  core:
    secretName: ""
  jobService:
    secretName: ""
  registry:
    secretName: ""
  portal:
    secretName: ""
  trivy:
    secretName: ""
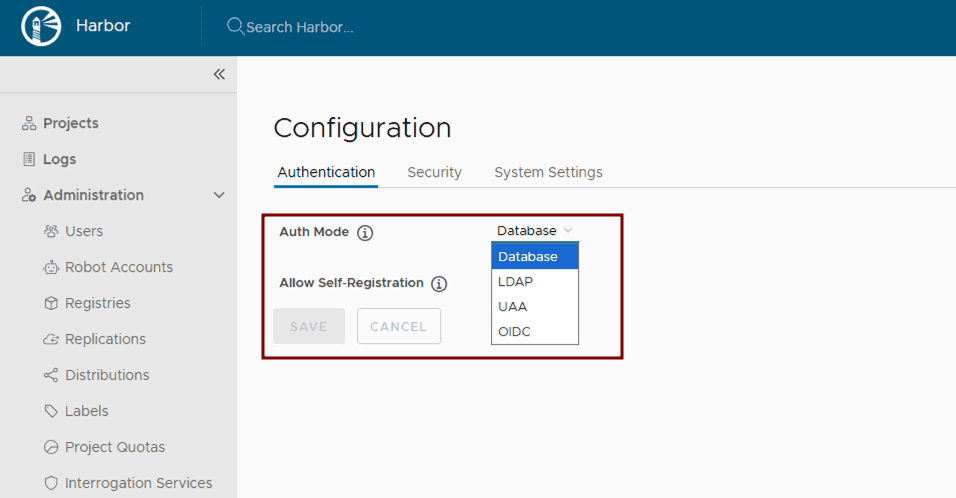
Configure authentication and authorization: Leverage Harbor’s supported Authentication and Authorization mechanisms for managing access to Harbor resources. After Harbor deployment, integrate Harbor with enterprise identity providers like LDAP or OIDC by following the Harbor configuration guides: Configure LDAP/Active Directory Authentication or Configure OIDC Provider Authentication.
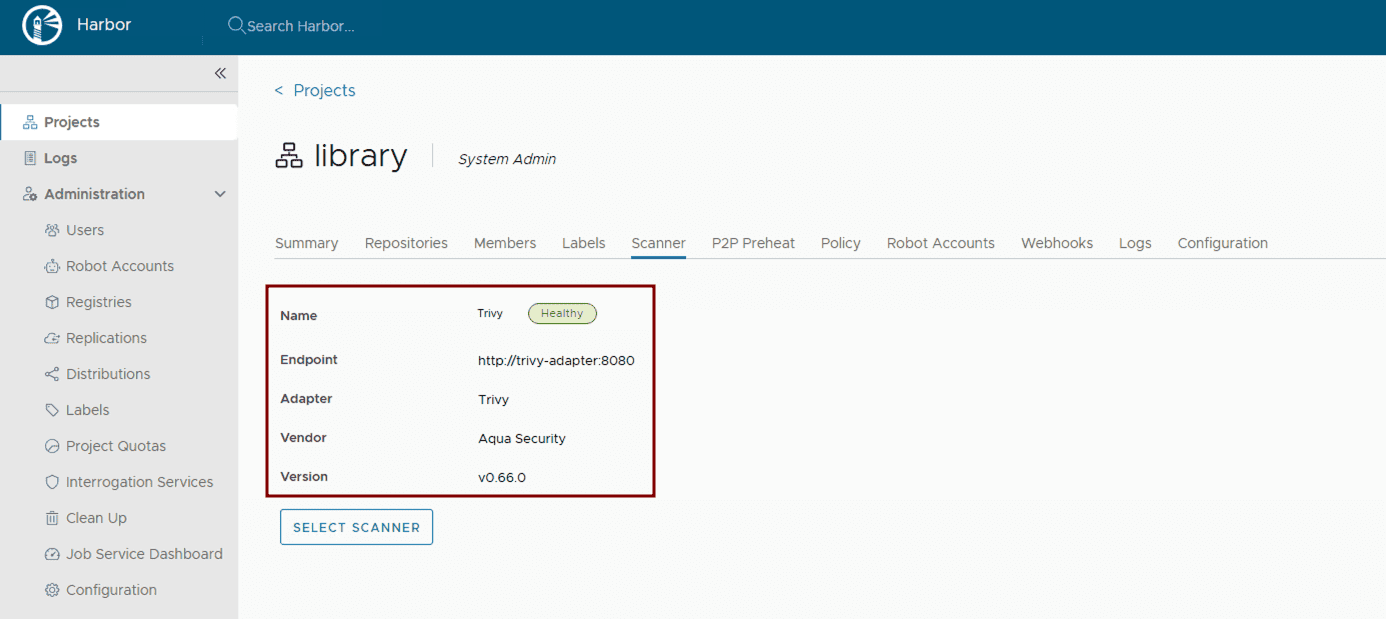
Implement vulnerability scanning: Ensure vulnerability scanning is enabled in values.yaml. Harbor uses Trivy by default. Verify its activation and configuration within the Helm chart.
trivy:
 enabled: true
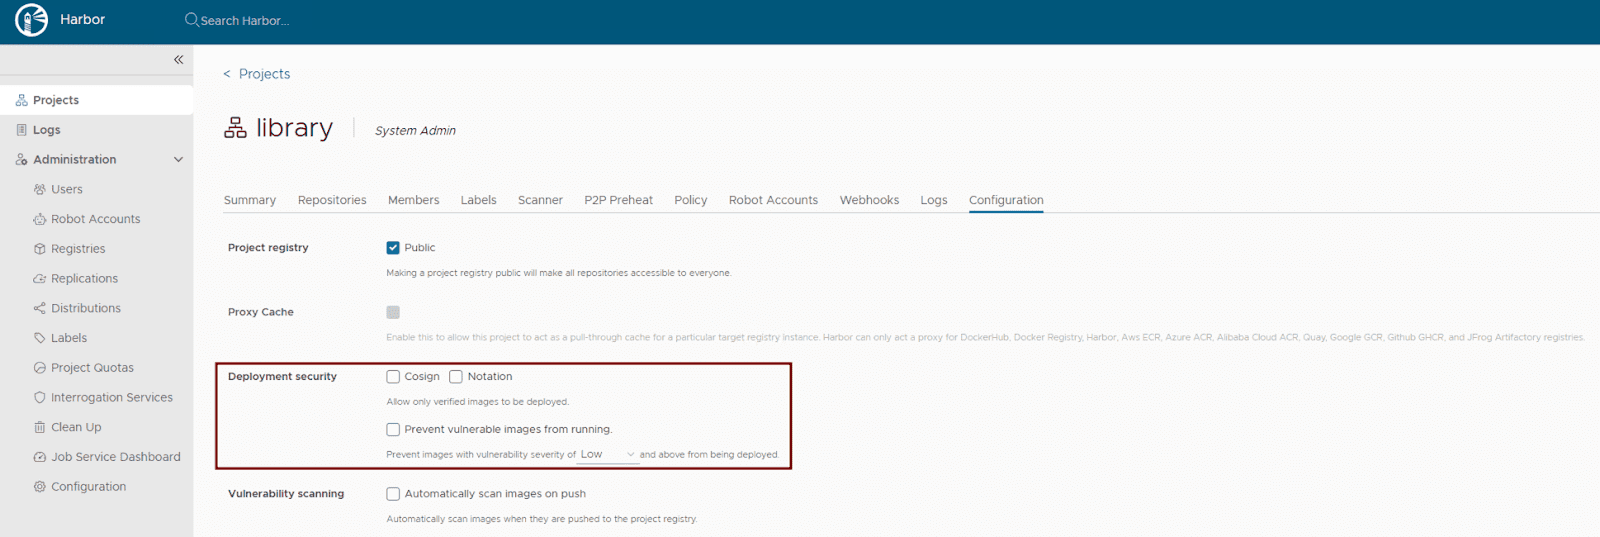
Activate content trust: Harbor supports multiple content trust mechanisms to ensure the integrity of your artifacts. For modern OCI artifact signing, Cosign and Notation are recommended. Enforce deployment security at the project level within the Harbor UI or via the Harbor API to allow only verified images to be deployed. This ensures that only trusted and cryptographically signed images can be deployed.
- Maintain regular updates: Regularly update your Harbor Helm chart and underlying Kubernetes components to benefit from the latest security patches and bug fixes. Use helm upgrade for this purpose.
- Use robot accounts for automation: Use robot accounts (service accounts) in automation such as CI/CD pipelines to avoid using user credentials. This ensures the robot account with the least required privileges is used to perform the specific task it has been created for, ensuring limited scope.
- Fine grained audit log: In Harbor v2.13.0, Harbor supports the re-direction of specific events in the audit log. For example, an “authentication failure” event can be configured in the audit log and forwarded to a 3rd party syslog endpoint.
3. Storage considerations
Efficient and reliable storage is critical for Harbor’s performance and stability.
- Choose appropriate storage type: Define Kubernetes StorageClasses that align with your underlying infrastructure (e.g., nfs-client, aws-ebs, azure-disk, gcp-pd). Specify these settings in your values.yaml:
persistence:
  enabled: true
  resourcePolicy: "keep"
  imageChartStorage:
    #Specify storage type: "filesystem", "azure", "gcs", "s3", "swift", "oss"
    type: ""
    #Configure specific storage type section based on the selected option
- Estimate storage sizing: Carefully calculate your storage needs based on the anticipated number and size of container images, as well as your defined retention policies. Configure the size for your PersistentVolumeClaims in values.yaml.
- Implement robust backup and recovery: Establish a comprehensive backup strategy for all Harbor data. For Kubernetes-native backups, consider using tools like Velero to back up PersistentVolumes and Kubernetes resources. For object storage, leverage the cloud provider’s backup mechanisms or external backup solutions. Regularly test your recovery procedures.
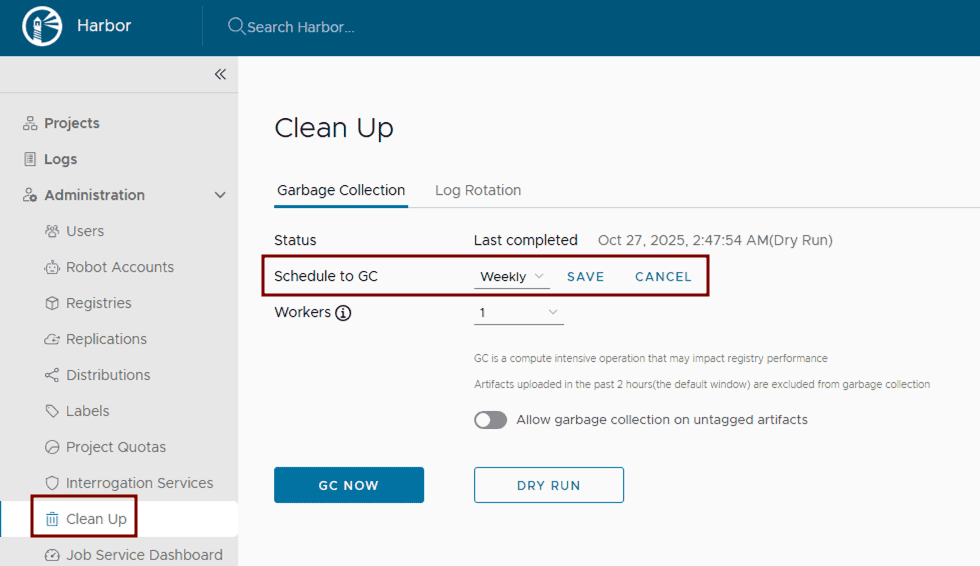
- Configure and run garbage collection: Set up and routinely execute Harbor’s garbage collection. This can be configured through the Harbor UI by defining a schedule for automated runs to remove unused blobs and efficiently reclaim storage space.
4. Monitoring and alerting
Proactive monitoring and alerting are essential for identifying and addressing issues before they impact users.
Collect Comprehensive Metrics: Deploy Prometheus and configure it to scrape metrics from Harbor components. The Harbor Helm chart exposes Prometheus-compatible endpoints in the values.yaml file. Visualize these metrics using Grafana.
metrics:
  enabled: true
  core:
    path: /metrics
    port: 8001
  registry:
    path: /metrics
    port: 8001
  jobservice:
    path: /metrics
    port: 8001
  exporter:
    path: /metrics
    port: 8001
  serviceMonitor:
    enabled: true
    # This label ensures the prometheus operator picks up these monitors
    additionalLabels:
      release: kube-prometheus-stack

# Example Service Monitor objects:

# Harbor Core (API and Auth Performance)
apiVersion: monitoring.coreos.com/v1
kind: ServiceMonitor
metadata:
  name: harbor-core
  labels:
    app: harbor
    release: kube-prometheus-stack
spec:
  selector:
    matchLabels:
      app: harbor
      component: core
  endpoints:
  - port: metrics # Defaults to 8001
    path: /metrics
    interval: 30s

# Harbor Exporter (Business Metrics)
apiVersion: monitoring.coreos.com/v1
kind: ServiceMonitor
metadata:
  name: harbor-exporter
  labels:
    app: harbor
    release: kube-prometheus-stack
spec:
  selector:
    matchLabels:
      app: harbor
      component: exporter
  endpoints:
  - port: metrics
    path: /metrics
    interval: 60s # Scraped less frequently as these are high-level stats
- Centralized logging: Implement a centralized logging solution within Kubernetes, such as the ELK stack (Elasticsearch, Logstash, Kibana) or Grafana with Fluentd/Fluent Bit.
- Configure critical alerts: Set up alerting rules in Prometheus (Alertmanager) or Grafana for critical events, such as component failures, high resource utilization (CPU/memory limits), storage nearing capacity, failed vulnerability scans, or unauthorized access attempts. Define these thresholds based on your production requirements.
5. Network configuration
Proper network configuration ensures smooth communication between Harbor components and external clients.
- Configure ingress or load balancer and DNS resolution: As already mentioned, deploy a Kubernetes Ingress controller or Load Balancer to expose Harbor externally. Ensure proper DNS records are configured to point to your Load Balancer’s IP address.
- Set Up proxy settings (if applicable): If Harbor components need to access external resources through a corporate proxy, configure proxy settings within values.yaml. It’s crucial to note that the proxy.components field explicitly defines which Harbor components (e.g., core, jobservice, trivy) will utilize these proxy settings for their external communications.
proxy:
  httpProxy:
  httpsProxy:
  noProxy: 127.0.0.1,localhost,.local,.internal
  components:
    - core
    - jobservice
    - trivy
- Allocate sufficient bandwidth: Ensure your Kubernetes cluster’s underlying network infrastructure and nodes have sufficient bandwidth to handle peak image pushes and pulls. Monitor network I/O on nodes running Harbor pods.
Conclusion
By diligently addressing these considerations, you can transform your basic Harbor deployment into a robust, secure, and highly available production-ready container registry. This approach ensures that Harbor serves as a cornerstone of your cloud-native infrastructure, capable of supporting demanding development and production workflows. From implementing High Availability and stringent security measures to optimizing storage and establishing proactive monitoring, each step contributes to a resilient and efficient artifact management system.
Continue reading the Harbor Blog Series on cncf.io:
Blog 1 – Harbor: Enterprise-grade container registry for modern private cloud
Announcing Kyverno 1.17!
Kyverno 1.17 is a landmark release that marks the stabilization of our next-generation Common Expression Language (CEL) policy engine.
While 1.16 introduced the “CEL-first” vision in beta, 1.17 promotes these capabilities to v1, offering a high-performance, future-proof path for policy as code.
This release focuses on “completing the circle” for CEL policies by introducing namespaced mutation and generation, expanding the available function libraries for complex logic, and enhancing supply chain security with upcoming Cosign v3 support.
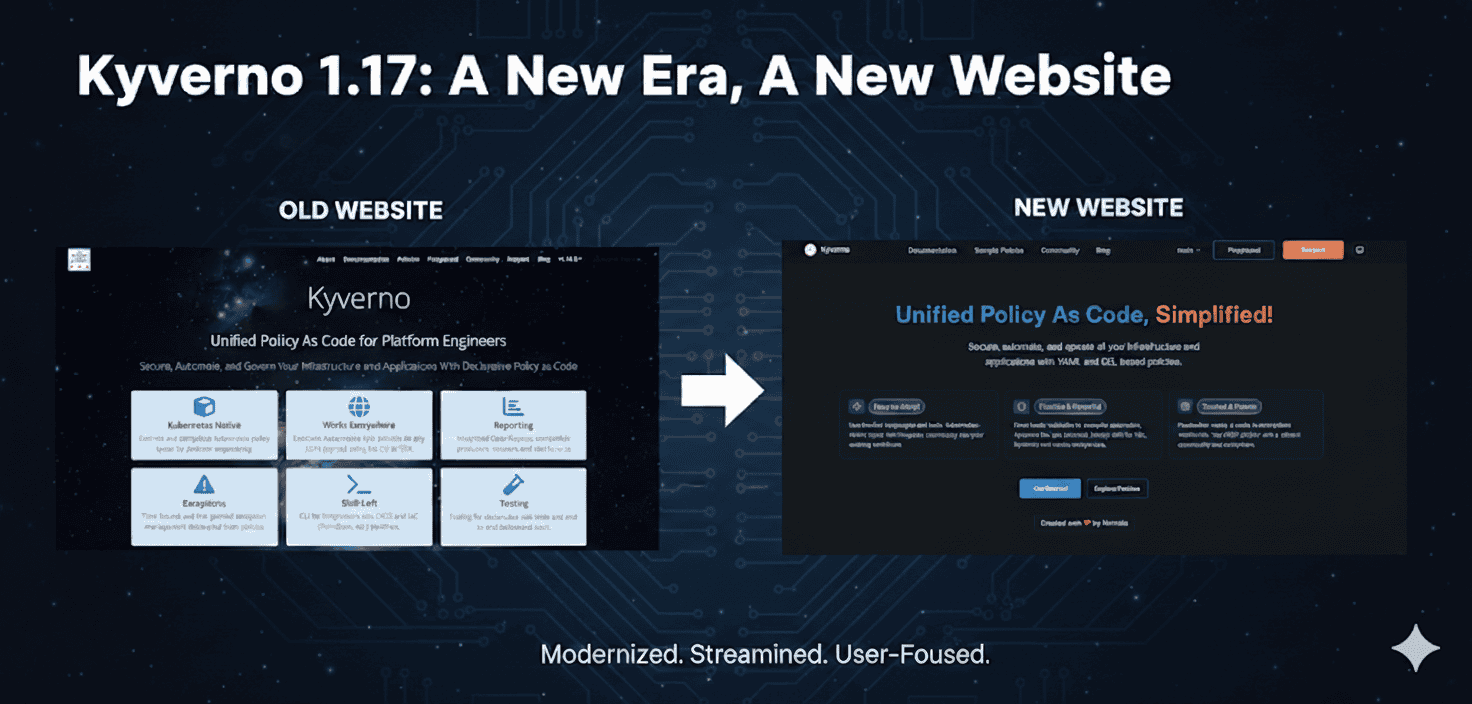
A new look for kyverno.io
The first thing you’ll notice with 1.17 is our completely redesigned website. We’ve moved beyond a simple documentation site to create a modern, high-performance portal for platform engineers.Let’s be honest: the Kyverno website redesign was long overdue. As the project evolved into the industry standard for unified policy as code, our documentation needs to reflect that maturity. We are proud to finally unveil the new experience at https://kyverno.io.
- Modern redesign
Built on the Starlight framework, the new site is faster, fully responsive, and features a clean, professional aesthetic that makes long-form reading much easier on the eyes. - Enhanced documentation structure
We’ve reorganized our docs from the ground up. Information is now tiered by “User Journey”—from a simplified Quick Start for beginners to deep-dive Reference material for advanced policy authors. - Fully redesigned policy catalog
Our library of 300+ sample policies has a new interface. It features improved filtering and a dedicated search that allows you to find policies by Category (Best Practices, Security, etc.) or Type (CEL vs. JMESPath) instantly. - Enhanced search capabilities
We’ve integrated a more intelligent search engine that indexes both documentation and policy code, ensuring you get the right answer on the first try. - Brand new blog
The Kyverno blog has been refreshed to better showcase technical deep dives, community case studies, and release announcements like this one!
Namespaced mutating and generating policies
In 1.16, we introduced namespaced variants for validation, cleanup, and image verification.
Kyverno 1.17 completes this by adding:
- NamespacedMutatingPolicy
- NamespacedGeneratingPolicy
This enables true multi-tenancy. Namespace owners can now define their own mutation and generation logic (e.g., automatically injecting sidecars or creating default ConfigMaps) without requiring cluster-wide permissions or affecting other tenants.
CEL policy types reach v1 (GA)
The headline for 1.17 is the promotion of CEL-based policy types to v1. This signifies that the API is now stable and production-ready.
The promotion includes:
- ValidatingPolicy and NamespacedValidatingPolicy
- MutatingPolicy and NamespacedMutatingPolicy
- GeneratingPolicy and NamespacedGeneratingPolicy
- ImageValidatingPolicy and NamespacedImageValidatingPolicy
- DeletingPolicy and NamespacedDeletingPolicy
- PolicyException
With this graduation, platform teams can confidently migrate from JMESPath-based policies to CEL to take advantage of significantly improved evaluation performance and better alignment with upstream Kubernetes ValidatingAdmissionPolicies / MutatingAdmissionPolicies.
New CEL capabilities and functions
To ensure CEL policies are as powerful as the original Kyverno engine, 1.17 introduces several new function libraries:
- Hash Functions
Built-in support for md5(value), sha1(value), and sha256(value) hashing. - Math Functions
Use math.round(value, precision) to round numbers to a specific decimal or integer precision. - X509 Decoding
Policies can now inspect and validate the contents of x509 certificates directly within a CEL expression using x509.decode(pem). - Random String Generation
Generate random strings with random() (default pattern) or random(pattern) for custom regex-based patterns. - Transform Utilities
Use listObjToMap(list1, list2, keyField, valueField) to merge two object lists into a map. - JSON Parsing
Parse JSON strings into structured data with json.unmarshal(jsonString). - YAML Parsing
Parse YAML strings into structured data with yaml.parse(yamlString). - Time-based Logic
New time.now(), time.truncate(timestamp, duration), and time.toCron(timestamp) functions allow for time-since or “maintenance window” style policies.
The deprecation of legacy APIs
As Kyverno matures and aligns more closely with upstream Kubernetes standards, we are making the strategic shift to a CEL-first architecture. This means that the legacy Policy and ClusterPolicy types (which served the community for years using JMESPath) are now entering their sunset phase.
The deprecation schedule
Kyverno 1.17 officially marks ClusterPolicy and CleanupPolicy as Deprecated. While they remain functional in this release, the clock has started on their removal to make way for the more performant, standardized CEL-based engines.
ReleaseDate (estimated)Statusv1.17Jan 2026Marked for deprecationv1.18Apr 2026Critical fixes onlyv1.19Jul 2026Critical fixes onlyv1.20Oct 2026Planned for removalWhy the change?
By standardizing on the Common Expression Language (CEL), Kyverno significantly improves its performance and aligns with the native validation logic used by the Kubernetes API server itself.
For platform teams, this means one less language to learn and a more predictable and scalable policy-as-code experience.
Note for authors
From this point forward, we strongly recommend that every new policy you write be based on the new CEL APIs. Choosing the legacy APIs for new work today simply adds to your migration workload later this year.
Migration tips
We understand that many of you have hundreds of existing policies. To ensure a smooth transition, we have provided comprehensive resources:
- The Migration Guide
Our new Migration to CEL Guide provides a side-by-side mapping of legacy ClusterPolicy fields to their new equivalents (e.g., mapping validate.pattern to ValidatingPolicy expressions). - New Policy Types
You can now begin moving your rules into specialized types like ValidatingPolicy, MutatingPolicy, and GeneratingPolicy. You can see the full breakdown of these new v1 APIs in the Policy Types Overview.
Enhanced supply chain security
Supply chain security remains a core pillar of Kyverno.
- Cosign v3 Support
1.17 adds support for the latest Cosign features, ensuring your image verification remains compatible with the evolving Sigstore ecosystem. - Expanded Attestation Parsing
New capabilities to deserialize YAML and JSON strings within CEL policies make it easier to verify complex metadata and SBOMs.
Observability and reporting upgrades
We have refined how Kyverno communicates policy results:
- Granular Reporting Control
A new –allowedResults flag allows you to filter which results (e.g., only “Fail”) are stored in reports, significantly reducing ETCD pressure in large clusters. - Enhanced Metrics
More detailed latency and execution metrics for CEL policies are now included by default to help you monitor the “hidden” cost of policy enforcement.
For developers and integrators
To support the broader ecosystem and make it easier to build integrations, we have decoupled our core components:
- New API Repository
Our CEL-based APIs now live in a dedicated repository: kyverno/api. This makes it significantly lighter to import Kyverno types into your own Go projects. - Kyverno SDK
For developers building custom controllers or tools that interact with Kyverno, the SDK project is now housed at kyverno/sdk.
Getting started and backward compatibility
Upgrading from 1.16 is straightforward. However, since the CEL policy types have moved to v1, we recommend updating your manifests to the new API version. Kyverno will continue to support v1beta1 for a transition period.
helm repo update
helm upgrade --install kyverno kyverno/kyverno -n kyverno --version 3.7.0
Looking ahead: The Kyverno roadmap
As we move past the 1.17 milestone, our focus shifts toward long-term sustainability and the “Kyverno Platform” experience. Our goal is to ensure that Kyverno remains the most user-friendly and performant governance tool in the cloud-native ecosystem.
- Growing the community
We are doubling down on our commitment to the community. Expect more frequent office hours, improved contributor onboarding, and a renewed focus on making the Kyverno community the most welcoming space in CNCF. - A unified tooling experience
Over the years, we’ve built several powerful sub-projects (like the CLI, Policy Reporter, and Kyverno-Authz). A major goal on our roadmap is to unify these tools into a cohesive experience, reducing fragmentation and making it easier to manage the entire policy lifecycle from a single vantage point. - Performance and scalability guardrails
As clusters grow, performance becomes paramount. We are shifting our focus toward rigorous automated performance testing and will be providing more granular metrics regarding throughput and latency. We want to give platform engineers the data they need to understand exactly what Kyverno can handle in high-scale production environments. - Continuous UX improvement
The website redesign was just the first step. We will continue to iterate on our user interfaces, documentation, and error messaging to ensure that Kyverno remains “Simplified” by design, not just in name.
Conclusion
Kyverno 1.17 is the most robust version yet, blending the flexibility of our original engine with the performance and standardization of CEL.
But this release is about more than just code—it’s about the total user experience. Whether you’re browsing the new policy catalog or scaling thousands of CEL-based rules, we hope this release makes your Kubernetes journey smoother.
A massive thank you to our contributors for making this release (and the new website!) a reality.